Baking a Cake From Scratch
Baking a cake from scratch is easy once you know Grandma's secrets. By knowing how Grandma baked her cakes, you'll be able to follow the old fashioned cake recipes and consistently make homemade cakes you'll be proud to serve.
Below you'll find all the secrets, such as how to prepare for baking, how to properly grease the pan, how to bake a flat top cake, how to know when your cake is done, how to cool it the proper way before decorating, and lots more. Everything you'll need to get started.
Baking a Cake From Scratch
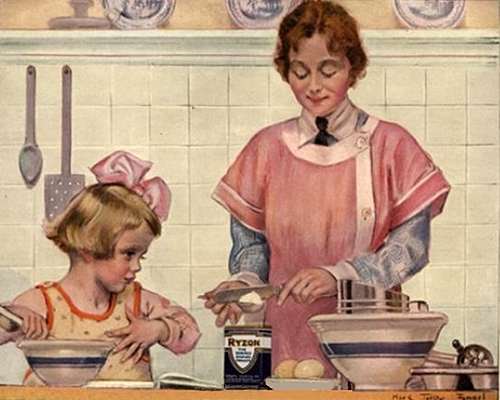 Mother and Daughter Baking a Cake From Scratch
(Source: Adapted from Ryzon Illustration circa 1917)
Learning how to bake cakes from scratch isn't rocket science, but it does require some practice along with a few basic instructions to get you started.
1. Pick Your Cake Recipe
Whatever old fashioned cake recipe you choose, realize that your first attempt is likely to be an experiment. Rejoice if it turns out perfectly, but don't be surprised if it doesn't.
As Chef Julia Child said, "No one is born a great cook; one learns by doing." Baking a cake from scratch was something that even the great Julia had to practice!
If you need the cake for a special occasion, and you haven't the time to experiment, always choose a cake recipe you're familiar with, one that you've used before. That way, you'll be certain of good results.
2. Prepare Your Ingredients
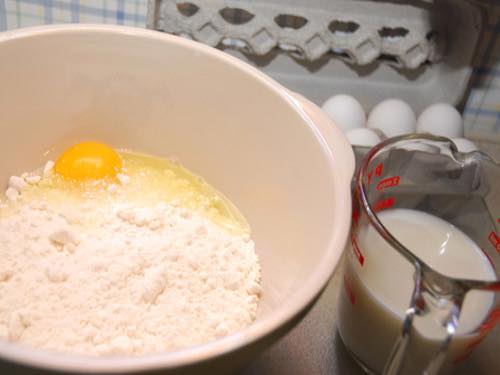 Get the Secrets to Baking a Cake From Scratch
(Source: DIYplr)
Before doing anything, carefully read your cake recipe and check to see that you have all the ingredients it calls for. There's nothing more frustrating when baking a cake from scratch than getting halfway through the mixing process and realizing you're missing something. Also, learn what ingredients you can substitute.
Be sure to measure out the ingredients and have them ready. That way, everything will go smoothly, and you'll be less prone to make an error. Also, there are times when you might need help with converting weights and measures.
You might find the help you need within the recipe itself, as a baking suggestion. And tips are sometimes given for best results when baking a cake from scratch.
And if you're ever stuck, click on the Red Button at the upper right of my pages for Recipe Help.
3. Preheat Your Oven
Set your oven to the temperature recommended in your recipe, allowing time for your oven to preheat. Help with oven temperatures is available should you ever need it.
4. Grease and Flour Your Pan
Prepare your cake pan by greasing and flouring it, unless your recipe says otherwise. By doing this important step early, it helps to make sure you don't forget to do it later.
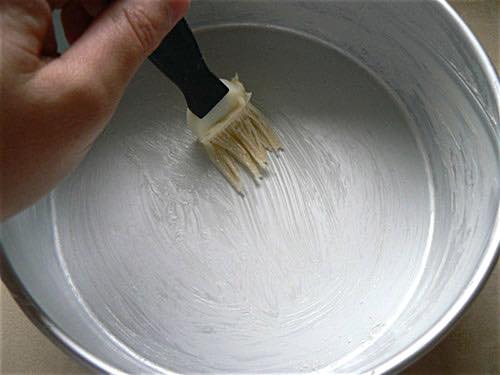 Grease and Flour Your Cake Pan Before Adding Batter
(Source: DIYplr)
Use a pasty brush to coat your pan's interior with softened butter. You don't need to overdo it, but the whole pan should be coated.
If you don't have a brush handy, simply use a small piece of wax paper to scoop up a bit of butter and smear it over the surface of the pan.
Then take a small handful of flour and sprinkle it over your pan. Shake the pan and tap its sides, moving the pan around until the flour has lightly coated the butter layer.
Dump out any loose flour, and your pan is ready for the cake batter, with less chance of your cake sticking to the pan later.
5. Test Your Cake
Always set your timer to the minimum baking time called for in the recipe. When the time is up, test your cake to see whether it's done using one or all of the following methods:
- Insert a toothpick or wire cake tester into the center of the cake, and if it comes out clean without any crumbs, your cake is done.
- If your cake shrinks from the sides of the pan, and it gives no steaming or crackling sound, it's usually considered done.
- Gently press your finger on the center of the cake, and if it jiggles or doesn't spring back immediately, allow more time for baking.
Repeat testing is vital as you won't want to over bake your cake. How to test a cake for doneness is the question most often asked by beginners when baking a cake from scratch for the first time.
Now that you know the cake testing methods and take care to use them, your cakes should always turn out perfectly baked.
6. Remove Your Cake From the Oven
After removing your cake from the oven, set the pan on a wire cooling rack to ensure that the bottom of the pan has air flow to help it cool.
Run a sharp knife around the edges of the pan to separate the cake from the sides of the pan, and allow the cake to cool for at least 15 minutes.
Just be sure to hold the knife vertical to the sides of the pan to avoid cutting into the cake.
The cake will shrink slightly as it sits cooling, and the separation will allow it to shrink evenly, instead of being stuck to the sides of the pan.
7. Allow Your Cake Time to Cool
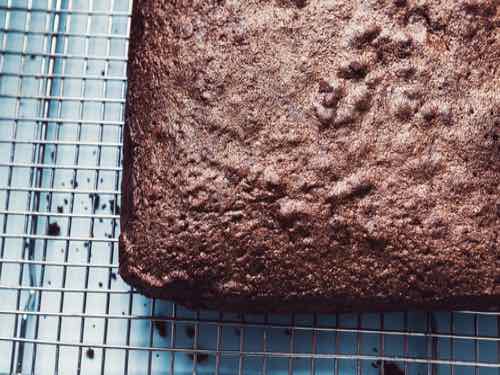 Allow Time for Your Cake to Cool on a Wire Rack
(Source: ©jodiejohnson/Depositphotos.com)
It's very important to allow your cake time to cool. Below, you'll find the instructions you need to accomplish this important step when baking a cake from scratch.
How Long to Cool a Cake
Unless the recipe calls for the cake to be cooled in the pan, usually you should remove your cake from the pan after it has sat for about 15 minutes.
Don't attempt to remove a hot cake from its pan immediately upon taking it from the oven; it's too delicate at that stage, and it might crumble and break.
Your cake must be completely cooled before you start decorating it, or your icing will surely melt. Allow about 3 hours to cool a large cake thoroughly.
Smaller, thinner cakes will require less cooling time. Always plan ahead to allow adequate cooling time.
By allowing the cake time to cool on the wire rack, it allows air to reach the entire cake, reducing moisture, and allowing it to cool more quickly.
Once cooled enough, you can safely turn the cake over onto a plate to finish cooling before decorating.
How to Remove a Cake From the Pan
To safely remove your cake from the pan, place a cooling rack on top of the cake, then turn over both rack and cake together, while gently tapping the pan's bottom with your fingers to release the cake.
You might need to run the knife around the edges of the pan again should it offer any resistance to being removed.
You'll find additional instructions below on how to remove cakes from various kinds of pans when baking a cake from scratch.
How to Prevent Possible Ridges
Placing a sheet of wax paper between the cake and the cooling rack will help to prevent possible ridges.
Grandma used to lay a clean tea towel across the rack. It still permitted some air flow, but it prevented the cake from having direct contact with the metal rack.
How to Remove a Cake That's Stuck to the Rack
If the cake appears stuck to the rack, simply place your plate over the bottom of the cake, with the top side of the plate in contact with the cake bottom.
Then, placing one hand over the bottom of the plate and the other beneath the cooling rack, turn the cake over and let it rest for a minute. It should separate from the rack, but if it's sticking to the rack, very gently rock the rack to loosen it from the cake.
When Baking a Cake From Scratch
Mom's Recipe Scrapbooks (c. 1920s)
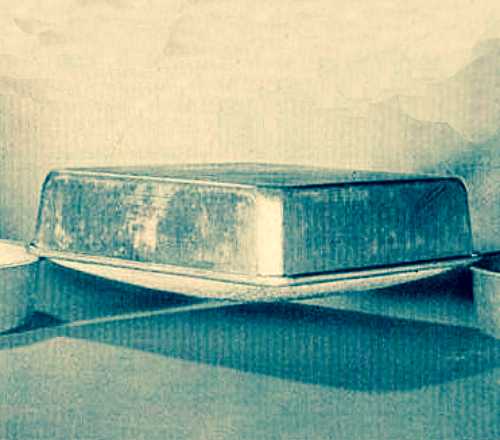 How to Cool Layer, Sheet, or Loaf Cakes on Two Pans
(Source: Vintage Magazine Article, circa 1920)
Be sure to remember the following cake removal tips, as you'll find them helpful once your cake is baked.
To cool layer cakes, sheet cakes, or loaf cakes, carefully turn them upside down so they rest on the edge of two pans. This setup allows air to circulate all around cake for cooling.
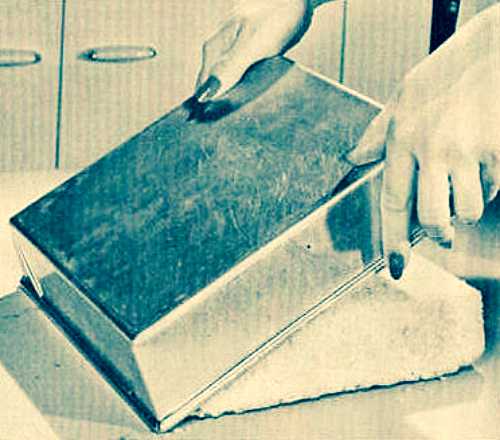 Removing Square, Oblong, or Loaf Cake from Pan
(Source: Vintage Magazine Article, circa 1920)
To remove square cake, oblong cake, or loaf cake from pan, loosen sides with spatula, or knife. Turn the pan upside down. Give edge of pan a sharp tap on the table and cake will release.
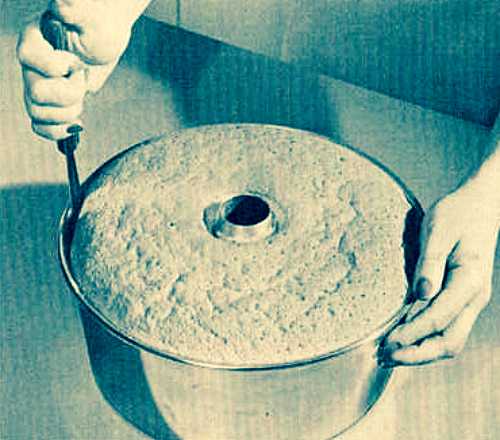 Using a Knife to Loosen Angel Cake from the Pan
(Source: Vintage Magazine Article, circa 1920)
When your round Angel cake is thoroughly cool, loosen side with spatula or knife. Turn your pan upside down. Hit edge of pan sharply on table top to remove cake.
How to Bake a Flat Cake Top
Cakes with flat tops are easier to ice and easier to stack should you wish to make a layer cake. Unfortunately, cakes sometimes rise in the center forming a little dome shape, and they sometimes crack wide open.
So, here's some of Grandma's practical tips to use when baking a cake from scratch and you want it perfect:
While it's always possible to take a long serrated knife, or a bread knife, and slice off the unwanted cake dome, there's an easier method that Grandma used which works much better.
She took an old terrycloth towel and cut it in strips as wide as the depth of her cake pans and long enough to wrap completely around them.
Just before placing her cake in the oven, she wet the terrycloth strip in cold water, ran her thumb and finger along its length to remove the excess water, wrapped the damp strip around the pan, and secured it with safety pins.
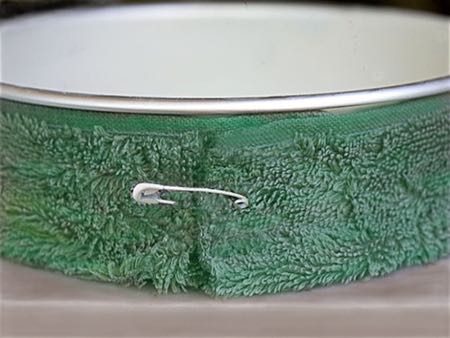 Homemade Cake Baking Strip
(Source: ©Don Bell)
How does it work? The moisture remaining in the terrycloth strip helps the cake to bake more evenly, so it rises with a wonderfully flat top.
Remember: Do NOT wring the strips out, just remove the excess water, as the wetness also prevents the strip from burning. Clever, eh?
Nowadays, you can purchase ready-made strips for your cake pans to do the same thing, but it's cheaper to just make your own. Baking a cake from scratch shouldn't call for unnecessary expense.
As Grandma would say, "Why spend good money on something when you don't need to?"
Secrets to Baking a Cake From Scratch
Dishes & Beverages of the Old South (1913)
 The Secrets to Baking Cakes from Scratch Revealed
(Source: Unknown Magazine Illustration circa 1920s)
Cake Baking Secrets
The very queen among cake makers sums up her successful baking secrets in a sentence: "The best of everything!"
Cake will never be better than the things whereof it is made, no matter how skilled the maker. But it can be, and too often is, dismally worse, thus involving a waste of heaven's good gifts of sugar, butter, eggs, flour, and flavors.
Having the best at hand, use it well. Isaac Walton's direction for the bait, "Use them as though you loved them," applies here as many elsewhere.
Here's some practical secrets to baking a cake from scratch:
- Have the eggs very cold, butter soft but not oily, flour dry and light — oven dry it in muggy weather.
- Let the butter soften well before undertaking to cream it. A stout, blunt wooden spoon is the best for creaming butter, along with a deep bowl very narrow at the bottom.
- Sift flour three times for ordinary cakes, twice for tea cakes, and so on, four to five times for very light things, sponge cake, angel's food, and measure it before sifting, and don't forget the needed amount — then you will be in no danger of putting in too much or too little.
- Always put a pinch of fine salt in the bottom of the mixing bowl, which should be freshly scalded with boiling water and wiped very dry. A damp bowl clogs with either sugar or flour, making the stirring much harder.
- Unless specifically directed otherwise, separate the eggs, chill the whites till time to whip them, beat the yolks very, very light — to a pale, frothy yellow; add the sugar, free from lumps, a cupful at a time, then the butter beaten to a creamy froth, beat hard together for five minutes, then add alternately the flour and the egg whites beaten to the stiffest possible froth.
- Add a pinch of salt as beating begins, and if the egg supply is scant, a teaspoonful of cold water to each white. This will increase the quantity and help to make the cake lighter, as it is the air bubbles imprisoned in the froth which give it its rising virtue.
- Add fruit and flavoring last thing. Fruit should be well floured but never clotted.
- If batter appears to be too stiff a little whisky thins it excellently, and helps to make it lighter. Put in two tablespoonfuls to six eggs, using more in proportion. Rose water or a liqueur have the same effect but give their own flavor — which whisky does not.
- Grease deep cake tins plentifully, with either lard or butter — using only the best quality.
- For heavy cakes such as fruit, spice, and marble cake, line tins with double thicknesses of buttered paper and either set shallow pans of water in the oven while baking or stand the pans themselves in other pans with a quarter inch of water in the bottoms.
- If cakes brown too fast, open the oven door, a little, and lay over the pan a thick, well buttered paper until the oven cools.
- The oven may be cooled quickly, if necessary, by putting a pan of cold water in it, on a lower rack.
- Never jar the oven while cake is baking in it — neither by banging the door, nor dumping heavy vessels on top of it. Beware likewise slamming kitchen doors, or bumping things about in the room. Fine cake demands as many virtues of omission as of commission. Indeed, the don'ts are as essential as the doings.
- Layer cakes need to be mixed thinner than deep ones. The batter must run freely. Half fill the tins and set in a hot oven, taking care not to scorch before rising is finished. Butter tins very freely — it is economy in the end.
- Be sure the cake tins sit level in the oven when baking a cake from scratch — thus you escape an ungainly, uneven final loaf.
- Get filling ready as baking goes forward so as to put your layers together while still warm and pliable.
- A cake which cracks open during baking indicates either that too much flour has been used or that the oven has been too hot at first.
- A coarse textured cake denotes the use of too much baking powder or too little beating.
- A cake that falls after baking indicates too little flour, too much shortening, or insufficient time in the oven.
- Let cake cool before frosting, so as to trim sides smooth.
- Take care fillings are not too watery, also that they are mixed smooth. Spread evenly, and press down a cake layer firmly all over, before putting filling on top.
- Layers simplify greatly the problem of baking, but to my mind, no layer cake, not even the famous Lady Baltimore, is equal to a fine deep loaf, well frosted, and meltingly rich throughout.
Pan Size Equivalents You Need to Know When Baking a Cake From Scratch
As for the size of cake pan to use with a recipe, it's sometimes a guessing game even for experienced cooks.
What I sometimes do is to have a couple of medium-sized pans (or one medium-sized pan and one smaller pan) ready for the cake batter.
In the end, I might only require the use of one pan, or I might use both. You can usually decide what size of pan is needed by judging the quantity of batter.
Here's one of the handy little cake baking tips that Grandma sometimes used when baking a cake from scratch:
You can easily calculate the capacity of any cake pan by measuring the water it takes to fill it, then compare to a rough estimate of the cake recipe's ingredients measured in cups.
Remember, layer cake pans should be only half-filled with cake batter to ensure the cake rises evenly.
If you find yourself trying to fit a round cake into a square pan or baking a cake in layers, you will find the following baking pan conversions very helpful when baking a cake from scratch.
9-Inch Square Cake Pan
Equivalent to one 11x7-inch pan, one 9x5-inch loaf pan, two 8-inch pie plates, or about 1 to 1-1/2 dozen cupcakes.
9 x 13 x 2-Inch Baking Pan
Equivalent to two 9-inch round pans, three 8-inch round pans, one 10-inch Bundt pan, or about 2 to 3 dozen cupcakes.
9 X 5-INCH LOAF PAN
One 8-inch square pan, one 9-inch square pan, one 10-inch pie plate, or about 1 to 1-1/2 dozen cupcakes.
Two 9-INCH ROUND CAKE PANS
Equivalent to two 8x4-inch loaf pans, two 8-inch round pans, one 9-inch tube pan, one 10-inch Bundt pan, one 10-inch springform pan, or about 1-1/2 to 2 dozen cupcakes.
9-INCH SPRINGFORM PAN
Equivalent to one 10-inch round pan, one 10-inch springform pan, two 8-inch round pans, two 9-inch round pans, or about 1-1/2 to 2 dozen cupcakes.
10-INCH TUBE PAN
Equivalent to three 9-inch round pans, two 10-inch pie plates, four 8-inch pie plates, two 9x5-inch loaf pans, two 8-inch square pans, or about 2 to 3 dozen cupcakes.
10-INCH BUNDT PAN
Equivalent to one 9x13-inch pan, two 9-inch round pans, one 9-inch tube pan, two 11x7-inch pans, one 10-inch springform pan, or about 1-1/2 to 2 dozen cupcakes.
Oven Temperatures to Use When Baking a Cake From Scratch
Many old fashioned cake recipes did not specify exact temperatures for baking, but simply suggested the following oven temperatures:
- VERY SLOW (275°F, 135°C)
- SLOW (325°F, 163°C)
- MODERATE (375°F, 191°F)
- QUICK or HOT (425°F, 218°C) oven.
You can also get accurate Oven Temperatures that will help you to get proper results when using the old fashioned cake recipes.
Baking a Cake From Scratch to Feed Crowds
- 1 pound cake serves 10 to 12 people
- 1 cake eight inches by eight inches may be cut into 20 pieces
- 1 pound loaf or square cake serves 10 people.
- 8 average sized cakes will serve 100 people
- 12 pound cakes will serve 100 people
Don't Be Afraid to Experiment When Baking a Cake From Scratch
Old fashioned cake recipes are sometimes skimpy on baking instructions, as it was assumed that household cooks of that time knew how to bake.
So, experimenting with the recipes is sometimes necessary and always part of the fun. Reading the practical cake baking secrets on this page will ensure you get successful results when baking a cake from scratch.
I purposely include several recipes of the same kind on each page since usually one or two of the recipes will suggest a specific baking time, the type of cake pan to use, and so on. What one recipe suggests will often work with the other recipes too.
The good news is that old fashioned cake recipes are very forgiving which is why many simply say or imply, "bake until done." The secret to baking perfect cakes from scratch is to test OFTEN for doneness!
Always feel free to modify the cake recipes to your preferred taste or available ingredients; that's part of the fun when experimenting with old fashioned baking methods.
For instance, you'll notice that some old fashioned cake recipes might call for a "pinch of salt" or "salt to taste," but most do not.
Since the historical recipes are presented exactly as first published to preserve the historical taste of the finished dessert, I've not added or modified the called-for ingredients.
Why was salt not a common ingredient in old fashioned cake recipes?
It's thought by some food experts that our modern palate craves a saltier taste because of the highly processed foods we've become accustomed to, whereas a less salty taste was considered normal in great-grandma's day when everything was home baked — and, it can be said, healthier.
Be sure to bookmark and return to this page whenever you are baking a cake from scratch and you need some assistance.
Sign Up now for GRANDMA'S DESSERT CLUB and download your FREE PDF COPY of Grandma McIlmoyle's Little Dessert Book. Also receive my regular Bulletin featuring classic recipes and nostalgia.
