- Home
- Recipe Help & Misc
- How to Tie Various Knots
How to Tie Various Knots
Learn how to tie various knots, and you will be amazed at how often your new skill will come in handy. Below you will find instructions for tying over 20 basic knots that you will find uses for in the kitchen, home, garden, and boating.
Learn How to Tie Various Knots
 Securely Tie Parcels Using Two Half-Hitches
(Source: ©Observer/Depositphotos.com)
Few persons know how to tie various knots nowadays. It is as easy, indeed easier, to make a neat, firm knot, one that's easy to untie, as one clumsy, insecure, and readily jammed.
When practicing how to tie various knots, it's better first to use a coarse cord or fine rope for easier handling. The 7 knots described below can all be mastered in an hour's practice, and will be found of daily use.
The Reefing Knot
 Figure 1: The Reefing Knot
As you learn how to tie various knots the old fashioned way, you will find the Reef Knot to be one of the most practical of them all. It's a basic knot that's quite strong yet very easy to tie.
Also called the flat knot, is the one best adapted for ordinary use in tying the two ends of a string. It is neat, flat, does not readily slip, and is easily untied.
It is the same as is used in tying shoelaces and neckties, except that the ends are drawn through. It is essential that the two parts of each string should be on the same side or there will be formed a "granny" knot.
The Sheet Bend Knot
 Figure 2: The Sheet Bend Knot
Also called the weavers' knot, it's used where great firmness is required; it is small, cannot slip, and can be made when one end of the string is just long enough to make a loop. It is more liable to jam than the one last named.
Bend one end of the cord into a loop, which hold in the left hand, pass the other end through the loop, around it and then under itself.
A little practice will enable the learner to use both hands at once, in which case it can be tied very quickly. It is easily made after learning the flat knot, by passing one end across or under the loop instead of through it.
It is obvious that in having the free end of the loop long it can be used instead of another end, and thus heavy bodies, as window-sash weights and clock weights are hung.
The Binding Knot
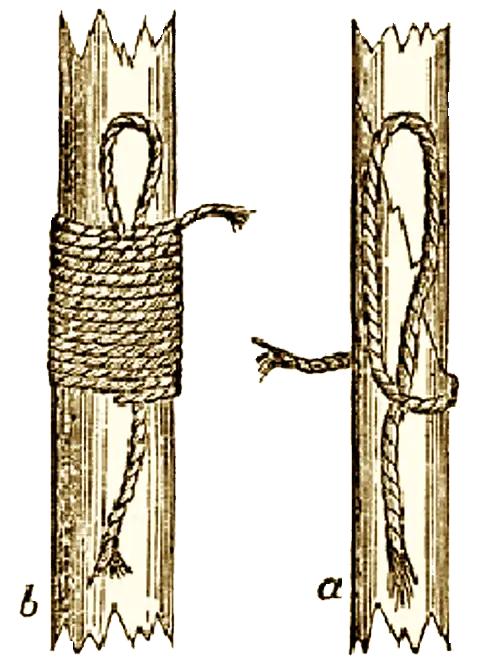 Figure 3: The Binding Knot
Is used for fastening broken sticks or rods after serving them with several turns of the cord which should never overlap.
Before beginning the serving make a loop a little longer than the proposed extent of the turns (a, Fig. 3). When the serving is finished pass the end of the cord through this loop, and by pulling in its free end the other is drawn within the serving and made secure (b, Fig. 3).
The Single Half-Hitch
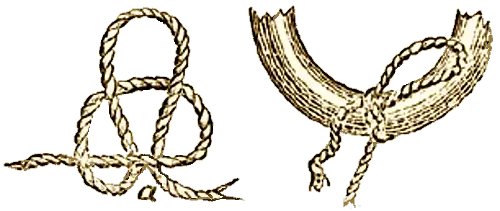 Figure 4: The Single Half-Hitch
Is made more quickly than any other tie, can be instantly undone, and is very secure. It is used to fasten ends of ropes in rings, etc., when they are to be quickly cast off, and may be used for slinging light bodies of small diameter.
It is also put over the tops of bottles to fasten in the corks when home brewing, and is then called the beer-knot: in this case the two ends are afterwards tied. By reversing, it becomes a running knot, or "sailor's knot."
In practicing, first take the fixed or "standing" part of the line in the left hand, make a loop in it: then make a second loop in the right-hand part, and put it through the first (a, Fig. 4).
Afterwards try it through rings. and around rods and small posts (b, Fig. 4). For large posts use the glove hitch; the single half-hitch will slip.
Remember that when it is to hold, the strain must come on the standing part. It differs but slightly from the common single bow-knot, and can be made as easily with a little practice. Be sure to master it when learning how to tie various knots.
The Clove-Hitch
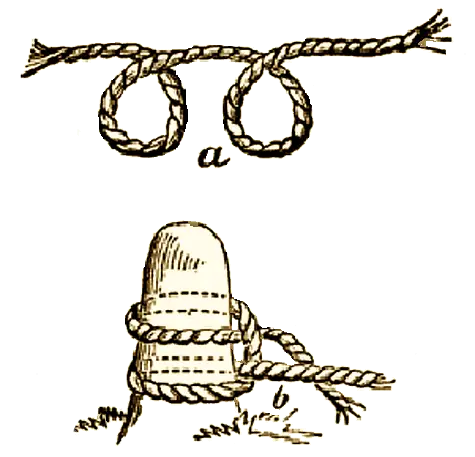 Figure 5: The Clove-Hitch
One of the most useful of all fastenings; it is not properly a knot, for it is neither tied nor untied. It is largely employed on shipboard and in reducing dislocations, but opportunities for its use in ordinary life are of daily occurrence.
In practicing, take the fixed or standing part of the rope in the left hand, turn the free end under it, and put it over the thumb; repent this, and the hitch is made. (Fig. 5.)
Tying a Parcel
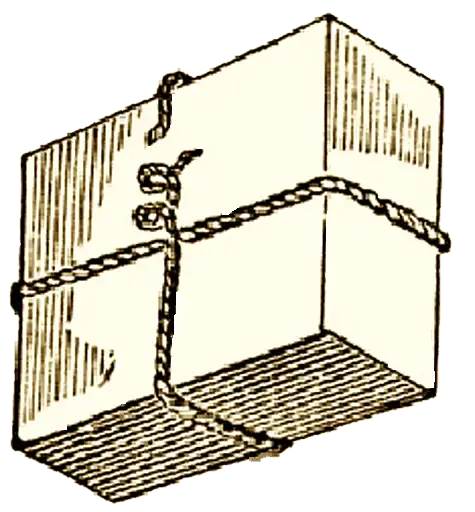 Figure 6: Tying a Parcel or Box
When the clove-hitch is made on the standing part of the rope, after it has passed around a post or box, it is called two half-hitches, and is the best method of fastening boxes or bundles. In this case, it should never be fastened to the cord at right angles to its own, but that in a line with it. (Fig. 6.)
The Bowline Knot
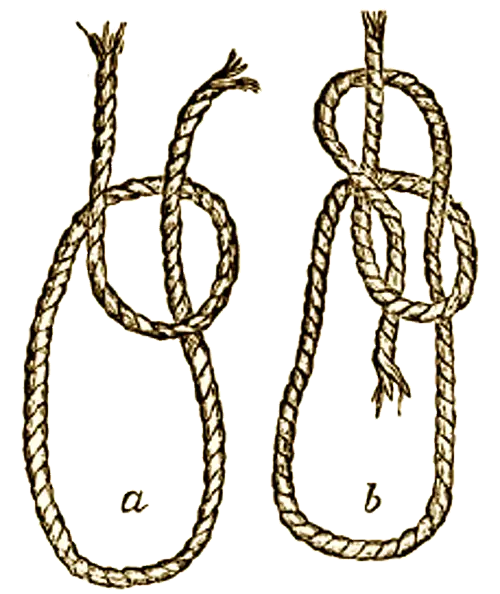 Figure 7: The Bowline Knot
Is used in slinging heavy bodies; it cannot slip, and will never jam under the heaviest strain. It is difficult to understand at first, but with a little practice can be made very rapidly.
Take the fixed or standing part of the rope in the left hand (this should be done in making all knots), lay the free end over it, and then by a twist of the wrist make a loop in the standing part which shall inclose the free end (a, Fig. 7); then carry the free end behind the standing part and through the loop, parallel with itself (b, Fig. 7).
When learning how to tie various knots the old fashioned way, this knot will well repay the trouble spent in learning it.
The Twenty Most Useful Knots
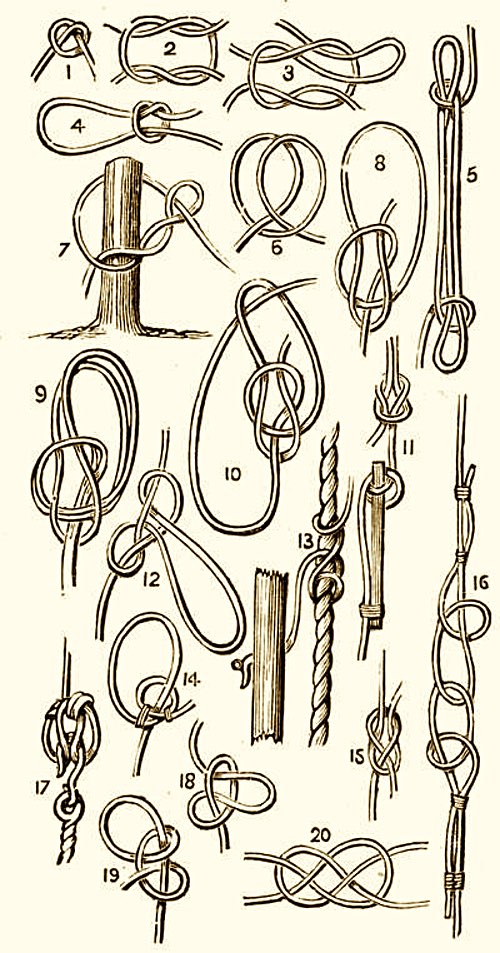 20 Most Useful Knots for Almost Any Purpose
When learning how to tie various knots the old fashioned way, you'll find the following types most useful and practical in life's situations:
- Thumb or over-hand knot, tied at the end of a rope to prevent it from opening out, &c.
- Right or reef-knot, for securing all lashings where the ends of the rope meet together.
- Draw-knot, which offers great facility in undoing.
- Running-knot, used to bind or draw anything close.
- Sheepshank, serving to shorten a rope without cutting it or unfastening the ends.
- Clove-hitch, which binds with excessive force, and by which alone a weight can be hung to a smooth pole.
- Timber-hitch, very useful in hauling to move a weight.
- Single bowline-knot, difficult to undo, useful to throw over a post &c., to haul on, used for the draw-loop of a slip noose.
- Double bowline-knot, for slinging a cask.
- Running bowline-knot.
- Woolding or packing-stick hitch, used to tighten ropes.
- Men's harness hitch, passing over the shoulder and under the opposite arm of men drawing a carriage, &c.
- Stopper hitch, for stoppering the fall of a tackle, &c.
- Inside clinch, for fastening a cable to the anchor ring, &c.
- Common or sheet bend, a very secure method of joining two ropes, or fastening a rope to a loop.
- Hawser bend, for joining two ropes, easily undone.
- Cat's paw, the turn in the bight of a rope, for hooking a tackle to it.
- Drag rope or lever-hitch, used for fixing hand spikes or capstan bars to the ropes attached to heavy carriages, &c., which have to be moved by men.
- Half-hitch, cast on the bight of a rope.
- Carrick bend. A wall-knot is a knot made at the end of a rope to prevent it from passing through a hole.
Bibliography
How to Tie Various Knots and its illustrations were adapted from The Household Cyclopedia of General Information by Henry Hartshorne, M.D., published by Thomas Kelly, New York, in 1881.
How to Tie 7 Basic Knots
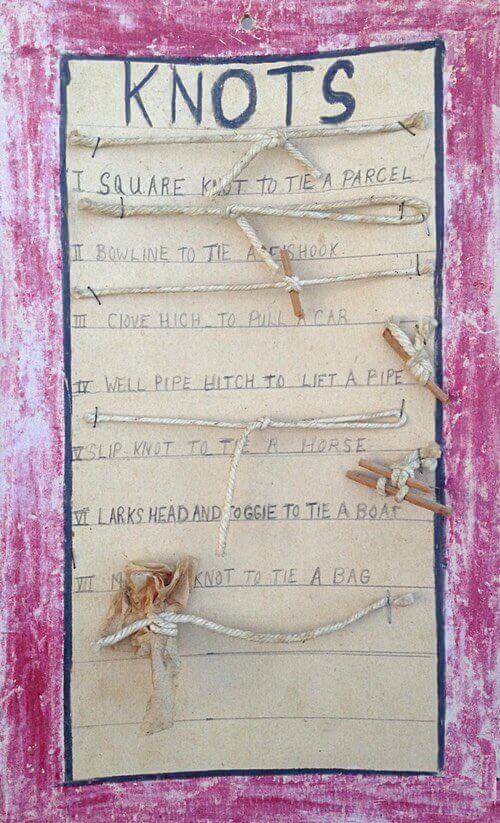 How to Tie 7 Basic Knots
(Source: ©Don Bell)
Pictured above is a card demonstrating how to tie various knots that I created for a merit badge when I was an eight-year-old Wolf Cub Scout in 1958.
The 7 basic knots were graded 7/10 by the Akela who said my printing could stand some improvement. Hey, I was only eight!
- Square knot to tie a parcel.
- Bowline to tie a fishhook.
- Clove hitch to pull a car.
- Well pipe hitch to lift a pipe.
- Slip knot to tie a horse.
- Lark's head and toggle to tie a boat.
- Miller's knot to tie a bag.

Sign Up now for GRANDMA'S DESSERT CLUB and download your FREE PDF COPY of Grandma McIlmoyle's Little Dessert Book. Also receive my regular Bulletin featuring classic recipes and nostalgia.


